In arthroscopic surgery two hands are needed to 'triangulate' the instruments within the field of view, so that the one hand can shine the camera light on the view while the other operate the instruments.
 First published by knee surgeon Angus Strover in 2008, and reviewed August 2023 by Dr Sheila Strover (Clinical Editor)
Once the arthroscope is in safely in the knee one is able to continue to work under direct vision. But surgeons often forget that they can use direct vision to determine exactly where to make their subsequent portals.
 |
 |
 |
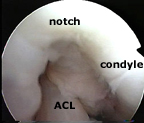
Remember that the arthroscopy started with the arthroscope in the antero-lateral portal, looking into the notch (blue circle) ... From here, it is possible to see the main features of the anatomy inside the knee cavity.
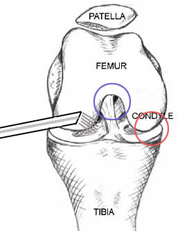
Moving the arthroscope over to the medial side (the right on the drawing) the surgeon can see the rounded end of the femur bone - the femoral condyle, which is normally covered with glistening white hyaline cartilage (red circle). Below this is the flat upper surface of the tibia bone - the tibial plateau.
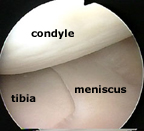
Sandwiched between condyle and tibial plateau is the flattened semi-circular (semi-lunar) meniscus, with its free edge on the inner aspect.
 |
 |
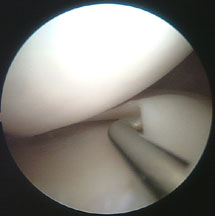
I'll just move the arthroscope over further to the outer edge of the meniscus. Here you can see that the meniscus is attached along its outer (lateral) edge to the joint capsule, which looks in this picture like a silk curtain over to the right.
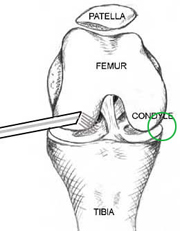
Remember I mentioned that surgeons often forget that they can use direct vision to determine exactly where to make their subsequent portals? Well, this part of the capsule, now under direct vision, is the area where a needle is passed from the outside to locate the right position for the portal. The needle makes very little damage, so it is OK to try two or three positions before committing oneself.
I'll show you what I mean.
The light source itself shines from the inside to illuminate the skin, identifying roughly the position where the needle should go.
Carefully a thin hypodermic needed can be pushed through from the skin into the joint, and it is easy to adjust its position to ensure that the next portal is made without damage to any of the structures.
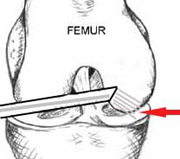
The scalpel then follows in the same position as the needle, to make the second portal under direct vision. Following this I introduce a small pair of artery forceps or the blunt end of a pair of dissecting scissors. I open these a little to stretch the portal and make it easier to introduce the probe, and the probe is introduced.
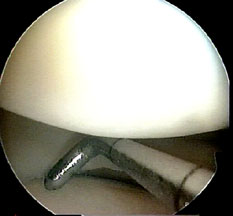
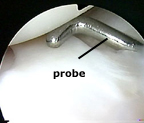
Because the probe has been placed under direct vision, it is exactly in the best position to examine the meniscus and joint surfaces.
From here, it is easy to slip the blunt end ender the meniscus, and examine it along its length for any hidden tears, and to feel the consistency of the joint surfaces.
Carefully, each anatomical part is examined, then arthroscope and probe are moved to a new area, around all the bends and twists of condyle, notch and meniscus.