The arthroscopic camera and instrumentation allow amazing views inside the knee but imposes their own restrictions.
 First published by knee surgeon Angus Strover in 2008, and reviewed August 2023 by Dr Sheila Strover (Clinical Editor)
In this lesson I will tell you a bit about the instrumentation an arthroscopic surgeon uses and how the instrumentation imposes limits on what can and cannot be done.
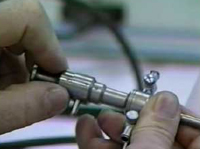
As I mentioned before, I have run skills workshops for many years, and during these workshops I insist on making the delegates take their equipment apart and reassemble it again several times over. It is surprising how few, even quite experienced, surgeons are unable to easily do this, relying on the scrub nurse to do it for them.
Why do I make the trainee surgeons do this?
Well, arthroscopy is a difficult discipline. Think of it. One is shining a tiny beam of light into the knee through a set of optic fibres attached to a series of rod lenses that magnify the image about forty times as well as directing the image at 25 or 30 degrees away from the direction of the scope itself. All of this is contained within a narrow gauge tubular instrument about 5 mm in diameter.
This is not like a conventional telescope or pair of binoculars which look straight ahead. It is like looking through a telescope at night with a prism on the end that directs both your vision and a light source 30 degrees to one side. The advantage of this angulation is, of course, the fact that by rotating the scope you can see a much wider field of vision without moving the telescope from side to side.
The image is then relayed onto a video screen about two metres away from the surgeon. It is like a video game. By looking at the screen the surgeon may be looking at the anatomy of the knee, diverted 30 degrees to one side. When the surgeon rotates the arthroscope (but not the camera which is attached to the eyepiece of the scope) by 180 degrees, he finds that the field of vision changes from 30 degrees to the left, to 30 degrees to the right. Without moving the scope from one side to the other, the surgeon can access a fairly wide field of vision.
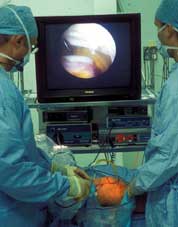
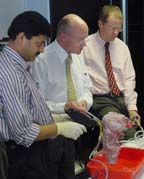
The surgeon is on the left, the assistant on the right.
In addition to the technical issues we have already discussed, the surgeon has to operate with his hands apart, but with the instrument tips close together. A bit like trying to knit while holding the far ends of the knitting needles instead of the tips!
The surgeon's eyes are on the video screen, not the knee. Not easy!! It takes a lot of practice.
Note the illumination of the knee visible from the outside - it gives an idea of the brightness of the light beam. Take another look at the surgeon's hands. He is holding an arthroscope in his left hand and an instrument, probably a 'grasper' in his right hand. Let's look at the former in more detail ....
The surgeon frequently has to change portals to look at an area from a different angle, and all this may require that the instruments are removed and disassembled several times, and then reassembled and reinserted. Dexterity speeds things up.
To make things more complicated, the 'seeing' is done entirely electronically. This means that if the television screen shows the anatomy of the knee correctly orientated, you know that the camera (which is attached to the eyepiece of the scope) is the right way up. This is like an observer standing normally upright and looking at a scene. When the camera is upside down, which is easily done as it is very small and light, the image on the screen is turned upside down, like when you look at a view by standing on your head or bending down and looking between your legs.
Finally, like a conventional telescope the arthroscope has manual focusing which is done by a rotating mechanism on the video camera.
It goes without saying that if the end of the arthroscope is too close to any structure within the knee it is difficult for the surgeon to recognise what he is looking at. It is like coming too close to an object with a telescope - you cannot recognise an object without being far enough away to see some details of its shape. Two things are important for the surgeon in this respect. Firstly the knee must be fully distended with saline to allow enough space, and secondly he must pull the scope back within the available space to clearly visualise (and photograph) the object.
The surgeon, therefore, has to introduce the arthroscope, turn on the irrigation to inflate the knee with saline, look at the screen, recognise the anatomy and orientate the camera correctly. He then may need to focus the image and at last by rotating the arthroscope and pulling it back if necessary he can get a reasonably broad view of the structures within the immediate surrounding of the end of his arthroscope.
Arthroscopy Setup
The setup for performing a diagnostic arthroscopy consists of:
- a fibre-optic arthroscope, with an eyepiece and a system for bending and focusing the light beam (inserted into the knee)
- a light source - with its light beam shining down the arthroscope into the knee
- a source of 'irrigation' fluid under pressure - again connected to the arthroscope
- a suction machine to remove the irrigation fluid - again connected to the arthroscope
- a tiny video camera attached to the eyepiece of the arthroscope
- a monitor screen to display the video image
- a recording device for storing images and videos during the procedure
- a blunt probe, held in the other hand from the arthroscope, for feeling the structures inside the knee
The arthroscope
The key instrument in an arthroscopy is the arthroscope. The word 'arthro' means 'joint' and the 'scope' means 'looking' - so this is an instrument for looking into the joint. We used to do just this - peering down the eyepiece into the joint - but nowadays the image is relayed via a camera onto a large TV-type screen (monitor).
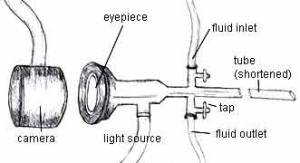
The stem of the arthroscope is a rigid fibre-optic tube or 'sheath' 5mm wide and the length of your forearm, in which can be slid a blunt 'obturator' to close off the tube while it is being inserted into the knee (both to protect the joint and prevent the arthroscope being blocked by anything). At the head end of the arthroscope is located:
- the eyepiece, which would normally accommodate a small video camera mounting
- a side inlet for the fibre-optic light source
- an inlet and outlet for the irrigation fluid, each of which has a little tap for controlling the fluid flow
The rigid arthroscope, being a straight rigid cylindrical tube with a narrow bore, has certain limitations:
- the image relayed to the TV screen is always a circular one
- only a small part of the joint can be seen at any one time
- if the surgeons pushes the arthroscope in too close, he may lose his way, and need to pull it a bit further out to get a wider field of vision
- the arthroscope cannot go around corners - although the light beam is bent usually to 30°, the surgeon frequently needs to 'change portals' to get a view around an object
The Blunt Probe
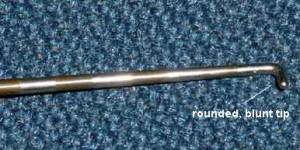
The next vital piece of equipment is the blunt probe, which is used for feeling and pulling structures within the knee joint.
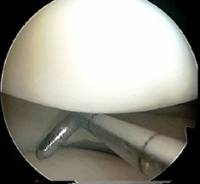
The first part of any arthroscopy should involve only the arthroscope and the blunt probe. Too many surgeons fail to fully explore the joint with the probe before dealing with any abnormality found inside. On the left, you can see the probe being used to explore under the meniscus.
On my skills workshops we sometimes have a 'desert island' quiz - "If you were stuck on a desert island and could only take three instruments with you to do your arthroscopies, which three would you take?"
It's a bit of a daft question, as you would also need an anaesthetist, anaesthetic drugs, electricity etcetera - but it usually results in enthusiastic discussion, and makes the delegates really look at their instruments critically.
Needless to say, the blunt probe is always one of the three. The other two are usually a sharp cutting tool and a toothed 'grasper'. But an arthroscope and blunt probe are all that are needed to perform a competent diagnostic arthroscopy.
Expanding the knee cavity
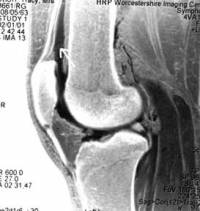
The space inside the knee joint is larger than one might expect, due to an extension of the joint cavity a handsbreadth above and behind the knee cap (the black space where the arrow is pointing).
During arthroscopy, clear fluid is pumped under pressure into the joint cavity to blow it up and make more space for the surgeon to see all the internal structures.
The fluid is led into the knee through the inlet valve on the arthroscope itself, and the pressure is supplied either by a pressure pump or by elevating the bag containing this irrigation fluid on a high drip stand. I talked earlier about the possibility of a separate inflow cannula to ensure sufficient fluid pressure, and this is my usual practice.
One of the important roles of the surgeon is to ensure that sufficient fluid pressure is maintained via the inlet while at the same time the cloudy fluid is allowed to drain out via the outlet.
One of the key reasons for novice surgeons failing to find problems inside the knee is simply that they do not know how to keep the joint clean an the fluid under pressure, allowing them to direct the light source to a clear field of vision. They struggle away in the darkness and can not only miss things, but they can do damage, too. This is one of the main reasons why I include an animal model in our skills workshops, to make the surgery as realistic as possible.
This is the end of Part 2. In Part 3 I will show you around the inside of the knee.